We’ve been working two or three days a week on this thing. This means we’ve been making a lot of progress, but I haven’t had the time to blog about it much. Let me see if I can catch things up to something remotely current…

Welding up the Drive Axle
We finally got started on the driveshaft. We welded it between two of our large tubes. This design allows for us to be able to remove the bearings and the shaft entirely if we need to change things up. The sides of the shaft are open, so we’ll be able to easily couple our 6 chains from the side. I need to replace some of the bolts with shorter ones, but that’s no problem…
The start of the rear suspension. Ready to hold some weight!
We also made some great progress on the rear axles. They’re split axles to allow for the differential to do its job and allow different speeds on the rear wheels while we go around turns. If you don’t understand differentials, here’s a video to explain it all.
The rear axles are suspended on a trailer spring. The frame is pulling down on the middle of the spring, and its leaves are in turn pulling down on the bearings that hold the axles of the wheels. We’ll see how this design works in practice. We still need to tie this rear axle to the axle of the differential. This will lock the axle from moving forward and backwards.

Double shocks for extra bling.
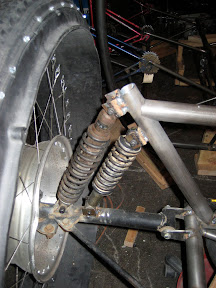
The front suspension was finally tackled. I had leftover parts from the golfcart, but I wasn’t exactly sure of their specs. I figured that the golfcart weighed ~500 lbs and could carry a couple of chubby golfers with ease. So let’s say the four springs were rated for ~1000lbs total. We’ve got eight people, so we can estimate about 1,200 lbs in just human flesh. Our contraption will probably make the difference up to a full 2,000 lbs. So I put all four springs up front and hoped for the best. I estimated how much pre-loading to put the springs under so that things sit flat while it’s loaded down with all of the weight. If the pre-loading is wrong I’ll have to grind some flanges down, add some spacers to get them roughly flat.
It doesn't look this crooked in real life.
We started welding in the supports for our bicycle frames. We used the driveshaft support as the anchor for all of the bicycles. The result is a bunch of bicycles that we can finally put some weight on! The front of the suspension also has a little platform that looks like it is mad to hold a cooler of beer. Sometimes good design just happens.

We're a few welds and some bicycle chain away from a ride around the block.
With the front and rear suspensions finally welded into place, we were finally ready to remove the blocks from underneath the frame and let the Feast roll on its own wheels for the first time. We put some weight on it and rolled it back and forth. It’s quite easy to push. We’re definitely going to fly on this thing. Now we just have to make sure to not add too much weight so everything will still work.
The rear suspension is definitely more tippy than the front. I still have some stiffening pieces of metal to add to the frame, so perhaps this will help. If not, we might have to figure out something else to stiffen it up.
I already have more progress made on the Feast, but that will have to wait till another blog post.